Understanding the Step-by-Step Process of Manual Instrument Ear Wax Removal
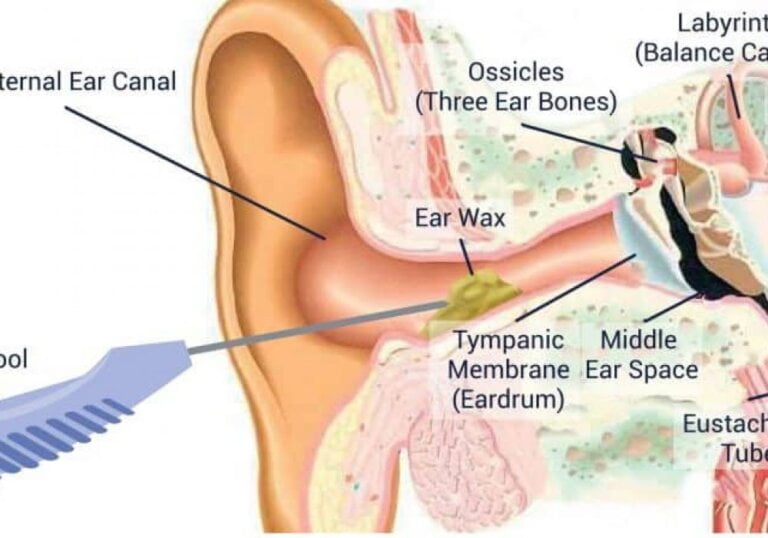
Ear wax, medically known as cerumen, is a natural substance produced by the glands in the ear canal. While it serves a protective function, excessive wax buildup can lead to discomfort, hearing loss, and other complications. Manual instrument ear wax removal is one common method used by Audiologist to safely and effectively remove excessive ear wax. In this article, we will explore the step-by-step process of manual instrument ear wax removal and provide you with a comprehensive understanding of this procedure.
Step 1: Assessment and Preparation
Before beginning the ear wax removal process, it is crucial to conduct an initial assessment of the patient’s ears. This assessment involves inspecting the ear canal using an otoscope, a specialised instrument with a light source. The otoscope allows healthcare professionals to visualise the ear canal and determine the extent of the wax buildup.
During the assessment, the healthcare professional will look for signs of excessive ear wax, such as a blockage or discoloration of the ear canal. They will also assess the patient’s symptoms, such as hearing loss or ear pain, which can be indicative of wax buildup. This thorough evaluation helps the professional determine the most appropriate course of action for the removal process.
Once the assessment is complete, the Audiologist will gather the necessary instruments for the procedure. These instruments typically include a cerumen spoon or curette, forceps, suction devices, and an irrigation kit if needed. It is important to ensure that all instruments are sterilised and properly prepared to minimise the risk of infection. Sterilisation protocols must be followed strictly to maintain a safe and hygienic environment.
Step 2: Patient Positioning
Next, the patient will be positioned appropriately to facilitate easy access to the ear canal. Typically, the patient is seated upright with the affected ear facing the Audiologist. This positioning allows for better visibility and accessibility during the ear wax removal process.
Proper patient positioning is crucial for the success of the procedure. It ensures that the Audiologist can comfortably and safely access the ear canal without causing any unnecessary discomfort to the patient. They may use a headrest or stabilise the patient’s head with their hands to maintain a steady position throughout the process.
Step 3: Softening the Ear Wax
To facilitate the removal process, it may be necessary to soften the ear wax beforehand. This is particularly important in cases where the wax is hardened or impacted. Softening the wax makes it easier to remove and reduces the risk of injury to the ear canal.
There are different methods that can be used to soften the wax. One common approach is the use of ear drops specifically designed to break down and loosen the wax. These drops often contain substances like hydrogen peroxide or saline solution, which help soften the wax and make it more manageable for removal.
The Audiologist will determine the most suitable method based on the patient’s condition and the nature of the wax buildup. They will also consider any underlying factors, such as the presence of ear infections or perforated eardrums, which may affect the choice of softening agent.
Step 4: Insertion of the Instrument
Once the ear wax has been sufficiently softened, the healthcare professional will carefully insert the chosen instrument into the ear canal. This instrument is designed to gently remove the wax without causing any harm or discomfort to the patient. The professional must exercise caution to avoid damaging the eardrum or pushing the wax further into the ear canal.
There are various instruments that can be used for ear wax removal, including cerumen spoons or curettes, forceps, and suction devices. The choice of instrument depends on the type and location of the wax buildup. For example, a cerumen spoon or curette is often used to scoop out the wax from the ear canal, while forceps may be used to grasp larger or more stubborn pieces of wax.
It is important for the Audiologist to have a clear view of the ear canal while inserting the instrument. They may use the otoscope to guide their movements and ensure precision during the process. The Audiologist will proceed slowly and gently, taking care not to apply excessive force or cause any discomfort to the patient.
Step 5: Removal of Ear Wax
Using the instrument, the Audiologist will carefully scrape or scoop out the ear wax from the ear canal. It is essential to move the instrument in a slow and controlled manner to prevent any injury. The Audiologist may use a combination of different instruments to ensure thorough removal of the wax.
During the removal process, the Audiologist will pay close attention to the texture and consistency of the wax. They will adjust their technique accordingly to effectively remove the wax without causing any harm or discomfort. The Audiologist may use a twisting or scooping motion to dislodge the wax, always being mindful of the sensitivity of the ear canal.
In some cases, the wax may be impacted and tightly adhered to the ear canal walls. In such situations, the Audiologist may need to exercise additional care and patience to ensure complete removal. They may also need to use specific tools, such as suction devices or irrigation, to assist in the process.
Step 6: Inspection and Patient Comfort
After the ear wax has been removed, the Audiologist will inspect the ear canal once again to ensure complete removal and assess any potential damage. It is important to address any concerns or discomfort the patient may have during the procedure. The Audiologist will also provide appropriate aftercare instructions, which may include the use of ear drops or other preventive measures.
The inspection phase allows the Audiologist to verify the effectiveness of the ear wax removal process. They will use the otoscope or other visualisation techniques to examine the ear canal for any remaining wax or signs of damage. If necessary, the Audiologist may repeat certain steps or recommend additional treatment options.
During this step, the Audiologist will also prioritise the comfort and well-being of the patient. They will address any residual discomfort or irritation that may have resulted from the removal process. The Audiologist may recommend the use of soothing ear drops or other medications to alleviate any symptoms and promote healing.
Step 7: Follow-up and Further Treatment
In some cases, manual instrument ear wax removal may not completely resolve the issue, especially if the wax is heavily impacted or if the patient has recurring ear wax problems. In such instances, further treatment options may be explored, such as suctioning techniques. It is crucial for the Audiologist to provide appropriate follow-up care and schedule any necessary subsequent appointments.
Follow-up care is important to ensure the long-term management of ear wax buildup. The healthcare professional may recommend regular check-ups and preventive measures to minimise the risk of future complications. They may also provide guidance on proper ear hygiene and tips for preventing excessive wax accumulation.
It is important to note that the manual instrument ear wax removal process should always be performed by a trained Audiologist. Attempting to remove ear wax at home using household objects or improper techniques can lead to complications and potential harm to the ear. Seeking professional help ensures a safe and effective removal process.
In conclusion, understanding the step-by-step process of manual instrument ear wax removal is crucial for individuals experiencing excessive wax buildup. By following a systematic approach involving assessment, preparation, softening, instrument insertion, wax removal, inspection, and patient comfort, healthcare professionals can safely and effectively address the issue of ear wax buildup. Remember to always seek professional assistance for ear wax removal to ensure the health and well-being of your ears.

